Opposing Vibrational Coils
Making sense of vibrational nodes in opposing coil systemsJan 17 2013
This setup will allow one to study and feel the vibrations of a circuit under load.
(Both voltage and pulse tweaking is possible.)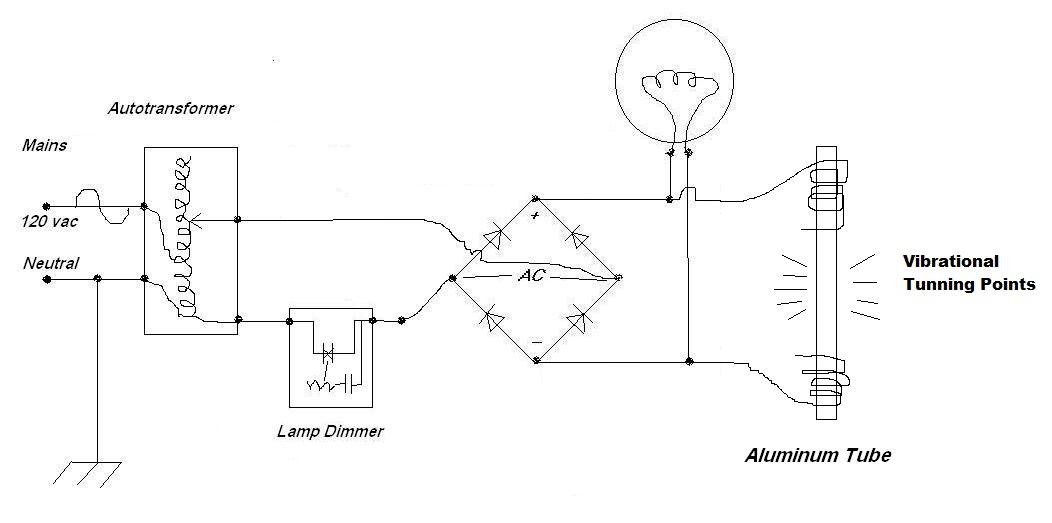
Make certain the ends of the opened coil wires on the aluminum tube are covered with insulation or wire nuts.
Two oppositely wound sliding coils are used to create a standing canceling node on the center of the Aluminum tube.
This is the vibrational energy form created by setting two AC coils in opposition.
In Joe Cell work it causes the engine to loose inertial resistance.
We see a couple of these coils also in Floyd Sweets diagrams.
The Aluminum Tube turns the vibration outwards for direct "feel felt" comprehension.
The Aluminum tube can be palmed and held in the hands, and the vibration is very strong to feel.
Pineal sense is used for tunning.
As the coils are slid around, they hit points where a unity harmony vibration is created on the Aluminum Tube.
The energy level shoots up very high at the point of crossing of the two vibrational fields.
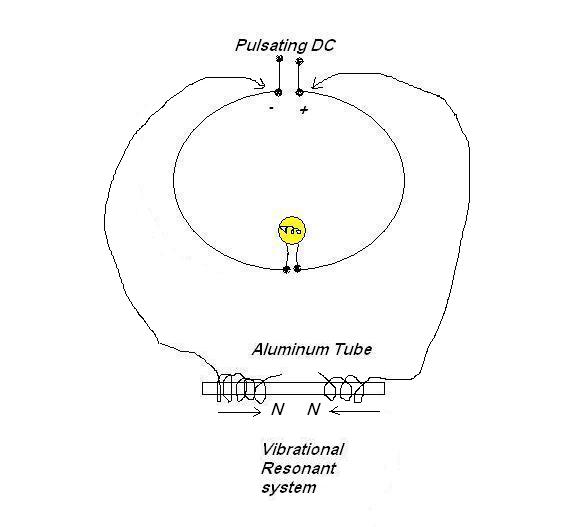
This next diagram shows how copper and aluminum have different qualities of radiance for the EM and Vibrational fields.
This becomes very obvious when handling these in a loaded powered circuit.

Using the AV plug and a meter, it is almost magical how the voltage only appears off the aluminum on the ends.
Slide the AV plug contact around the corner or edge of the aluminum to the side and the voltage is entirely gone.
It is assumed that a copper core will do this off the sides, and the vibration will be running the length of the copper.
Thus in a circuit the vibration from two sides will meet at the center.
If the load is placed at the center of the two vibrational coils, then the copper will transmit it right into the load, and the load will vibrate up.

Showing two different configurations to create a nodal area of higher energy at the load point of the circuit.
One can then experiment with distance tunning to create harmonic ratio coupling through the load.
This will open a direct vibrational channel between the load and the Source.
Extension of Feel Felt Coupling Methods
[Aluminum Tube]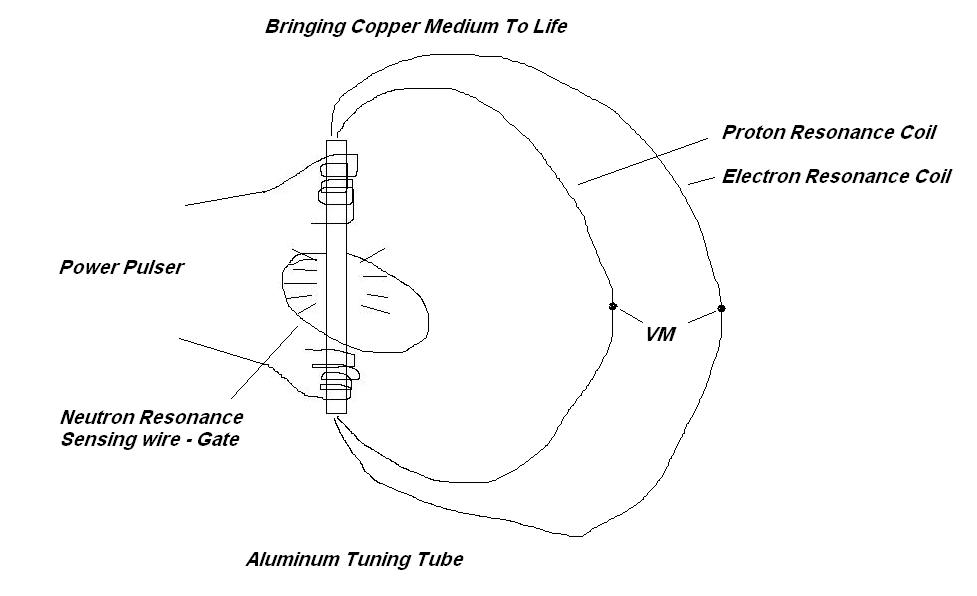
A matrix resonant wire loop is placed on the center of the Aluminum tube, as a sensing device for tunning the power supply pulsing output.
Where the Neutron level is sensed to vibrate up on this wire, from careful adjustments of the coil spacing, the lamp dimmer and the voltage,
We can be reasonably sure we have tapped into the nuclear core of the copper atom.
Now we can experiment with coil loops at 90 degrees passing through the center of the tube which are resonant with other layers of the copper atoms shells.
There are not less then 4 fractal lengths to play with, passing through the center like this.
We will be passing them through an energy bubble at the center of the Aluminum tube, which resembles the nucleus of the copper atom.
Resisters in series can determine currents, and VM across different loop fractals can determine voltages.
This is one experimental platform, for identification, of the function of each level of the copper atom, and the control of power in copper medium.
.
Fractal References Copper Medium
Electron Layers
5.66 mm 8.89 mmProton Layers
12.06 mm 15.07 mmNeutron Layers
7.26 mm 5.22 mmDiagonal Mediator
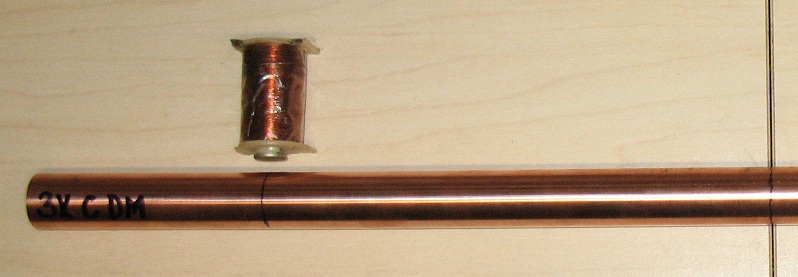
24.14 mmFabrication of a DM Copper Tube for System Core Balancing
[Bringing Order to Chaos]
Wave Pattern
579.36 mm = 57.936 cm
A copper tube cut to this 24x length, should vibrate itself up with the Copper DM vibrational field.If used in place of the Aluminum tube above, it is expected the tube will down shift the 24.14 mm infinity fractal by 8x, into 3 sections.
Each section can now have a coil wound over the center of the segment where the sine wave is largest for experiment.
It is expected this tube will compress the tensors towards the center, and overlap on the Neutron coil.
Place marks on the tube at 96.56 mm from each end and in the center at 289.68 mm.
This is where electrons crossing over the tube will have the greatest electrical effects.
Mark the tube 3X C DM for 3x Copper DM fractal.
This tube can be held centered in front of the scope with a dot on the screen for feeling if you are at resonance length.
This is a pretty large copper tube, and should be easy to experiment with coils on it.
It is always good form to first cut a copper wire of your theoretical length, and verify you can feel the three segments expected,
before committing expensive copper tube materials to the length. If the wave pattern above does not raise from the wire, then we must regroup.

I crafted this one with 3/4" type L heavy copper pipe. It is very active vibrationally.
Hold an iron core coil at the marked points and they do vibrate up nicely!
Standing waves working as expected.
Center segment Coil System

Next we will place the small coil at the center to resonate up on one or both of the neutron fractal lengths.
This wire must be touched on the end of the wire, to tune the power pulsing circuits to access the neutron level, or the gate.
Remembering that the vibration carrying power in copper runs it's longest length.
It must also pass at least one wrap over the exact center of the the segment to work properly.
Any prime number multipliers can be used to get any length desired.
7.26 mm x multiplier [11x] = 79.86 mm
5.22 mm x multiplier [11x] = 57.42 mm
As an alternate we can experiment with one wire that will resonate up both wavelengths by summing the two.
79.86 mm + 57.42 mm = 137.28 mm
The two wavelengths will mix to a very tiny level, however we will not know which one is becoming active as we tune.
Recommend try all three for tuning possibilities. The two will have very different results in the energy polarity.
Small one is expansive from the core and the larger one is contractive from just outside the core of the atoms.
Two Opposing Outer Injection Coils

To complete the testing unit we need to place two outer coils on top of the two outer segments, for injection of vibration from the powering circuit.
It should not take much more then about 13 turns of well insulated copper wire to accomplish this.
Care is taken to position them exactly over the center of the vibrational segments.
If they are made to slide freely then this tunning can be played with also.
Pass Through Coils

Electron Layers
5.66 mm / 8.89 mm
Proton Layers
12.06 mm / 15.07 mm
Outer / Inner
These will be discreet wires cut to lengths based on the Electron and proton fractals,
and sized to reach all the way around, passing through the center of the copper tube, forming an output circuit.
Large prime multipliers will ensure high frequency couplings.
Even counts will down shift frequency.
There are many combinations possible for mixing the 4 fractals using summing as well.
Mix the two outer E and P fractals into one sum length.
Mix the two inner E and P fractals to one sum.
Mix the two E into one sum.
Mix the two P into one sum.
Keep all 4 as discrete fractals and measure interactions operating between them.
Pi/2 ratio of the two E fractals in two discreet wires should tend to self generate off one another.
Etc.
[Shooting for a coil system that has only copper medium in the final design.
Once effects are confirmed, smaller constructions can be calculated.]
Dave L
Fractal Calculations
In the first field I am going to keep the Electron wavelengths short and down shift the Proton wavelengths.Minimum Length to reach through the tube and have working ends, ~ 3x tube length > 174 mm
E1 wire 5.66 mm * prime 313= 1771.58 mm = 177.158 cm
E2 wire 8.89 * prime 199 = 1769.11 mm = 176.911 cm
P1 wire 12.06 mm *even down shift 144 = 1736.64 mm = 173.664 cm
P2 wire 15.07 mm * 5x fractal 115 = 1733.05 mm = 173.305 cm
Note I have kept the range around 173 to 177 cm even though the fractals are not that close.
Using multipliers of 313,199,144,115 to equalize the lengths where I want them.
Disclaimer
It is recommended a GFI be placed in any circuits used to experiment with wall powering energy.As well adequate fusing should be used on the input to the autotransformer.
It is assumed that personal have training in the safety issues of using house current in lab or bench construction techniques.
Experimenting with voltages over 24 volts, can be hazardous to the human body and may even cause death.
Back to PCC menu
