Joe Cell Charging Sequence
6 / 24 / 8
Due to multiple failures, I have endeavored to record the basic steps
to get a Joe Cell up and working clean. This may be helpful for a
novice.
These procedures were come by after many failures, but may lead to a
cell that will sustain itself and never die over time, not need to
be refilled much, while not producing or manifesting a continual precipitation of solids such as iron.
Also I hope to offer an intuitive set of observations as to the torsion
states of the cell for those developing sensitivity in this direction.
For powering an engine it must be clearly understood we do not want an outflow torsion field, but an inflow.
This is done by setting up the correct cell voltage polarity. Negative
or ground potential will go on the inner tube, and outer can is a
Positive for only a short period to start the cell and align it
properly. If done correctly the water will instantly produce gas with
the slightest of vacuum applied.
It is highly recommended those studying the Joe Cell effect watch the
videos referenced at the bottom, and hear it "striaght from the horses
mouth" as Joe has allowed these to be shared.
There is a lot of good info written to date on the Joe Cell units, and
as many ways to do this as there are experimenters, but there are
several things found to be common that do not change.
This document will update anyone following my own research, and in the
past two documents, there are many problems encountered if trying to
interface to a car, and many incorrect notions addressed.
I am thankful I have had Bernie to keep coaxing me and correcting my
thinking at each step through the process this time. I have learned
more then most simply from doing exactly as he instructed, but I have
needed this record because these concepts do not seem logical at first.
Joe Cell Basics - Hydrogen Breeding Mode

The positive wire is tapped on the outer can 4 times and then removed,
in the latest versions of the JC videos, and like a magic spell the
cell comes to life, producing a + voltage on the outer can as well
as gas on demand by vacuum.
There are many descriptions of cell dynamics, so I will add my own
present mental model here, from what I have observed only on the bench
to date. The cell is a "breeder" that
harnesses the vibrations of H and O. Once properly powered up it
creates H atoms with no end in the form of monotomic Hydrogen, or even
possibly some smaller more primal version of H atoms. If not set up
correct it may also produce solids seemingly having no end, and
continue to crud up the surfaces of the cell, even after the water has
been filtered repeatedly.
It is
not our goal to break down and loose the water inside the cell, but to
set up a torsion process, which may even lead to breeding H and O atoms
within a vacuum anywhere
nearby. Anywhere we channel the gas inside the cell and out the tube,
there will follow a strong H vibrational field. What I have come to
sense as the "H field."
Cell geometry in this case with negative inwards, and very low voltages
used to charge the cell, will produce a self sustaining effect where by
a constant supply of some kind of gas is present, and the water level
will not drop in the cell. The water expands slightly, and is easily
gassed by adding a vacuum. Monotomic Hydrogen is the smallest atom
there is, it can escape any container. I believe it is only the
diamagnetic field once it is built that can contain it, and sustain it
in this form for more then a small time period. As well, the best
metals to hold this are SS and Aluminum, as they provide a diamagnetic
field. In a plastic container all the H atoms will escape quickly, and
only H2 and O2 will be left, and these are far less energetic
configurations for building a diamagnetic field.
I have identified two of the strongest torsion vibration fractal resonant lengths in this
breeding mode at 4.2 cm and 7.2 cm
that are radiant very near the cell.
Fashioned two resonant devices that can help to identify if this energy
is present. A disc and tube. Pictures further down will be offered
showing the significance. If you are torsion sensitive these tools may
help you to identify if and when the cell enters a higher density
operation level.
Notes from the videos:
In one of Peters videos, he states the tubes can be polarized each one,
by holding the negative wire on the bottom outer surface, and
taping now the positive wire to the inner upper surface. Once all the
tubes are aligned this way now the entire assembled cell is also done
this way. Ground the negative to the outside center tube at bottom, and
move down the tubes hitting each one on the inside
with the positive
wire. [I will do this on my next cell assembly and see if the cell
comes up correctly. Below is my own method used after the water is in
the cell to reverse a wrong polarity.]
"Joe" also speaks out against using Aluminum or Copper in the cells, as
copper will create dirty water that cannot be cleaned, and aluminum
will corrode away fast when water and electricity hits it.
Cone lids are not necessary. Simple flat or tapered, or even rounded lids can all be used effectively.
3 gases are identified by the sound of the pop when lit off using
matches. One will explode, one will implode, and the third may be doing
both, but it seems to be the most powerful one.
Water Conditioning and Passivation Process
This is the absolute most important step and the easiest to accomplish,
but the last thing anyone wants to read about. I might add the cheapest
part of JC work you will ever do and will save you many hours of wasted
time in the future, cleaning up messy rust colored water and cells. If
you skip either of these steps, I promise you will be revisiting this
at a later date or you may just give up the endeavor.
Before you actually get to the point of filling a beautiful shinny new
Stainless Steel [SS] Joe Cell, you have to be sure that after the water
hits the cell it will not instantly start to create rust. Rust in
massive amounts. While SS is created to stay rust less above the water
level, under the water is a different story, especially after the
electricity hits the cell. To stay shinny the SS must have a good
supply of Oxygen, and instead of rusting, it produces Chromium Oxides,
that form a layer of Chrome on its beautiful shinny surface.
If you charge a cell up backwards and also use it to clean the water
you may rust it up quite fast. Charged the correct way, after a
Passivation cycle, it may never rust again. The cell in the above photo
was just passivated, notice the shine on the tubes. For the previous
few months it sat with heavy iron layering in a reversed charged state
after I had been incorrectly electrolyzing the water inside it, to study the outflow effects of the torsion field.
Rule 1, passivate the two important components that will be used to charge the cell.
1 - The cell itself
2- The Electrolyzer or water conditioner element
Rule 2, Build an electrolyzer

This unit was made from 6 very cheap SS electric switch cover plates.
It took one hour to create using small cable ties and two pieces of SS
wire, and 10 pieces of plastic stand offs of 1/4" thickness.
I simply ran the cable ties through the holes already present, and then
the spacers, and on the outside they even grab the electrodes. Two
cable ties through each hole and then joined and ends and cut.
I later found out that these should be built with 1/8" gap and replaced
the spacers. At 1/4" gap they set up a linear torsion field,
and this
is a noteworthy experiment in itself, very similar to a tube device but
not useful for the water conditioning phase. [The conventional Joe Cell
method would use one more plate and connect a third wire to center
plate, with two each neutral plates between them, on each side, and will need
less voltage then mine. This method runs the outer voltages both
towards the center. See the videos and note Joes stack of funnels.] Mine
workes fine however for cleaning up the water and giving it an initial
electric charge.
Rule 3 do not electrolyze the
water in the Joe Cell - this is a cleaning step for the electrolyzer.
The Joe Cell geometry is what adds the torsion field charge.
Passivation

I use a chemical called Ospho, I mix it 50 percent with water so it
will bubble a rich supply of Oxygen. It is green and contains a high
concentration of Chromium atoms which give it the dark green tint, and
a host of other nasty stuff like acids. Place the electrolyzer into the
mix and then apply about 5 volts which will produce about 5 amps, for
only a few minutes. The resistance of the liquid is very low. There are
many small white bubbles produced. Now reverse the polarity for an
equal time. You have now fully electroplated
all the surface with a new layer of chromium oxides due to the heavy
oxygen bubbling this produces around all the surfaces. All the rust
should be gone if there was any present, and the metals will have a
much greater resistance to rusting, especially if they are anything
less then surgical grade SS. This method is fast and seems to produce
good results for me.

Now do the same to the cell. Fill to the top of the tubes with the
liquid and then electrolyze it at about 5 volts, 5 amps with DC, both directions to plate all surfaces that will be under water.
Save the Ospho mixture for next time, it is expensive. Your two water
conditioning components are now passivated. They will shine as if new,
and if used properly will not rust up, or add to the waters iron
content.
Condition the Water

Tap water, water is water right? All of it has the potential to be a vibrant life form if cleaned and cleared! Just like us.
Bernie states, "1 amp hour of juice." This could be 1 amp for 1
hour, 1/2 amp for 2 hours, or 4 amps for 15 minutes. He also recommends
many breaks to make sure water does not get too hot and boil out. I
used 100 vdc from a couple very nice stable power supplies and could
only get .4 amps, so it took
me a bit of time using the 1/4" spacing plates. This will remove
impurities and finally make very small white bubbles when completed.
They call this "stage 3" water, and is easier and faster to make
outside the Joe Cell then inside. Much easier to clean up the mess also.
During the process the water must be filtered as the impurities drop out. Here was the worst of my first batch.

Filtering removes the iron as it falls out during the electrolyzing step.
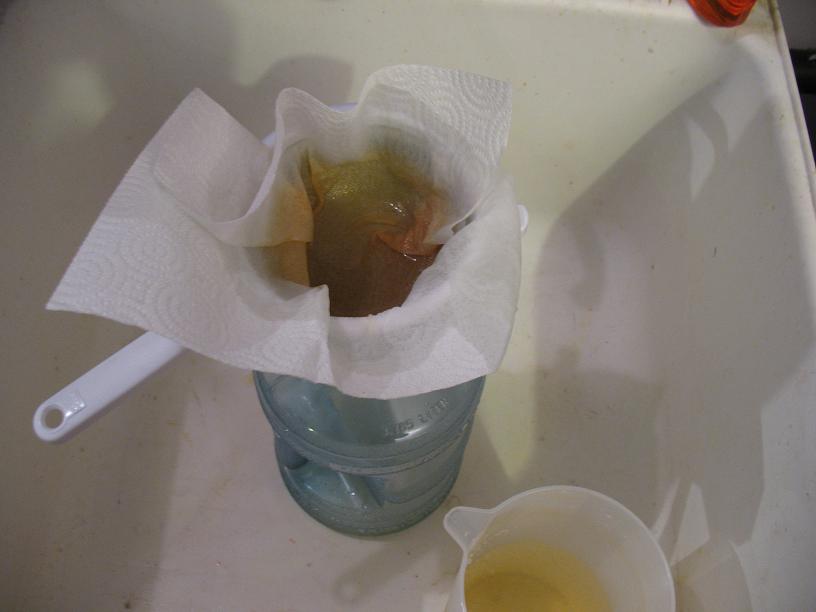
I filtered about 4 times during the cleaning process.
I used a SS mesh cauldron setting on a SS funnel in the top of the
plastic jug, with a paper towel filtration system that seems to grab
the rust and the heavy water also which will not want to go through the
filter.
Alternate water precleaning method - using magnets
It was later discovered that by wrapping the copper water line in the
house with 4 stacks of neo magnets with South poles inwards,
and using
layers of duct tape to isolate the metals, the water became very clear.
Conditioning no longer produced the iron deposits from my
local hard water. This is a technique for cleaning up water in ones
house, and I can now fully testify it seems to work well.
Joe tells us that copper cannot store water without producing large
amounts of nasty filth, and that you cannot keep water clean inside
copper. The magnets were a nice discovery, thank you Smokey of the
c_s_s_p group for recommending this. Both copper and aluminum are not
good elements to store drinking water in, the magnets help
tremendously. The water will still have to be electrolized now, but far less
iron will manifest during this process.
Water is now ready to go in the cell. I have processed two batches,
about 1 gallon. This water feels charged, and produces very tiny white
bubbles near the end of the electrolizing process. After two days of
setting in the pitcher it still feels vibrant. Make sure the water has
fully cooled before filling the cell, as the electrolizing process can
heat it up.

Here you can see, for the first time ever, my water is completely clean
after a week of cell operation with proper polarity and inflow torsion
established.
This was not an accident, and one more step must be fully grasped to get to this level, proper charging.
Charging the Cell
I used a digital voltmeter, to read
between each tube without loading the voltages with an older low
impedance, opened face meter. If you were to just pour the electrolyzed
water in and start reading the gaps, the voltage between successive
tubes, and they all came out with + to the outside then you would
have a perfect charge! However for me this is unlikely and some method
of altering things is needed to produce consistent results, even for a
stubborn gap that won't reverse. If your water is freshly electrolyzed
this could in fact happen! I have yet to witness this miracle. One
water section may often come up with reversed voltage polarity.
I set up a low pulsing voltage on the cell
before filling it with the water, and then I pour it in slowly so as to
not generate too much bubbling.
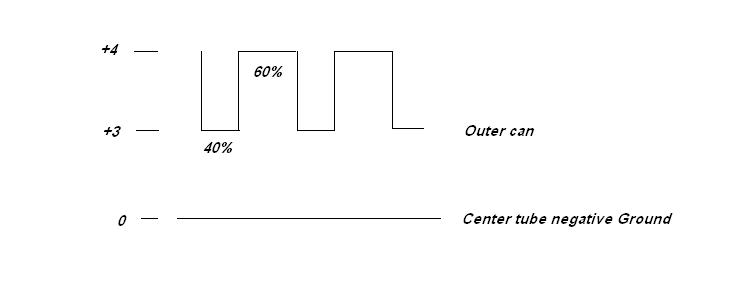
Pulsing Voltage:
I sat up a charging pulser system for an absolute polarizing of the tubes based on the cells resonance dynamics and final voltage.
This involves a function generator with a DC offset. I scanned the cell and discovered a torsion resonance at 5 hz.
The composite signal I apply is ground on the center tube and a +4
volts pulsing to +3 volts at 5 Hz on the outer can, using a 40 / 60
duty cycle. This pulse is + more then it is negative, and this is
important. It is biased positive to ensure we will not interfere with
the cells natural final voltage, and still produce a small negative pulse
to the top of it. After this negative going pulse is released the cell
sucks this energy into its torsion field, and slowly exposes more
diamagnetic field during the longer 60% of the cycle. The field then begins to grow, and it is a conscious
field. What I now refer to as the "H field." [The diamagnetic Hydrogen
resonance.]
I believe too much voltage will act against you and delay stable settling in of
the self sustaining torsion field forming. We are trying to bring the cell up
to its natural voltage without too much electron activity, and using
this method was amazingly easier then all the bubbling you could do for
hours. Joe Cell orthodoxy states to connect the negative wire first and remove it last,
I have no such beliefs as of yet and believe it is all in the amount of
electrons we set in motion that will determine the outcome, but be
warned, it may be a good habit to form early on with the cells as later
in the car currents may go much higher then in my charging cycle here.
The cell can be totally reversed if this is not done correctly in the
car.
Reverse Polarized Gap:
If you have a reversed polarized gap simply move the leads directly
across that gap. Joe recommends proceeding from the outside inwards as
I recall, but I see no need to pulse a gap that has already polarized
correctly with electrolyzed water already in the cell. Work the gaps
until all have a voltage drop in the correct direction, then pulse the
entire cell for a couple minutes again to make sure it equalizes. The
above chart is actually a little more then needed and the 3 volts can
be reduced to 1.5 to be more accurate in the Northern Hemisphere. I
first used only 2 volts pulsing to 1 volt and got my stubborn gap to
reverse in a matter of seconds.
Before this, I may have needed to
remove the tubes and do some rather nasty things, including palming
them all again or banging them with a hammer when the moon is full!
LOL! [Peter has now shown us an easier method during cell assembly
described above, in the Video Notes section.]
A Coherent Torsion Field:
Now if you have not made any bubbles the torsion will become coherent
and hold the charge aligned perfectly. In the Northern Hemisphere this
is observed around 1 to 1.5 volts that will remain constant. In the
Southern Hemisphere it is around 3 volts. This is what I call conscious level 1, a self sustaining torsion field.
I believe this step is the art of Joe Cells and what sets up the
unusual magic possible. It can also be done with DC but it is very hard
to reverse an incorrect gap in this way. Very low voltage pulsing is
the fastest method I have used to date. Coaxing the positive H atoms to
grab the negative electron pulses energy, and giving long enough rest
timing for it to take between negative going pulses.
After you remove the charging leads, the cell will now start to
naturally equalize and the torsion field will continue to grow. As long
as you feel the field present it is probably ok. The voltage on the
inner gap will normally drop and on the outer cell gap will increase.
As long as none reverse you have succeeded! The cell is now charged.
I place a flat Aluminum plate over the cell and this will increase
the charging as well as help hold the alignment for the first few hours
while the SS atoms adjust also to the field presence and all the tubes
fully align. The tubes will be forming diamagnetic node imprints, that
can be located long after they are removed from the cell and dried!
I also discovered in this step that the inner SS wire electrode I
simply coiled and pressed inside the inner tube interferes with the
cells torsion output, enough that I removed it completely after the
initial charge took. This seems to verify that when made permanent it
should be on the outside lower edge of this inner tube for an inflow
cell configuration. This is opposite I found for an outflow setup in
previous experimental documents. This also confirms for me what Bernie
had stated earlier on this subject as to where to place the wire.
Playing with the Energy - Propagation
Rod Probing:
Using many of my Light Resonant rods I probed the cell over days and
determined the strongest coupling point is at the exact center of the
cell. Any Light resonant rod with end placed here will light up with
the H field and propagate it strongly to all its node positions above
the cell and into you holding it. 1/2" OD SS tubing was the best
coupling. I finally sat down and did a wire cutting session right over
the cell. Bernie had suggested I try tunning into the water itself and
find lengths to interact at this level. I did scans, one for the
vertical and one for the horizontal. I ended up with a great many
vertical lengths and only a few horizontal ones.
Resonant Lengths Observed:
I discovered that copper is not a good propagator of the H field due to
its tendency to shift the energy downwards to its own numbing
vibration, but the SS and the Aluminum interact strongly and still
preserve the strength of the H field without sucking it down in
vibration. The H atom has the highest frequency I have felt to date
resonating in a 4.2 cm SS wire rod when held in the horizontal position around the cell. A 7.2
cm SS wire resonates the vertical field most strongly, and I associate
this with the O atoms. These are a best guess from how they feel. I
tried a scalar copper coil on the tube and decided it lowered the H
field and produced a nasty "headache level" copper frequency.

Charged Water with Vacuum:
I fabricated a SS tube threaded into the Aluminum top plate, with a quick gasket material to seal the seam for vacuum tests.
Pressing down on the top I then sucked in the tube and was amazed that
the water, after setting several days, instantly gassed and bubbled up,
wetting the top on the inside of the lid completely.
Normal water having set for about two days will generally go completely
flat, and this is how you treat aquarium water. This was my next clue
that Joe Cell water is not in the normal flat state even after days
setting in a charged cell. The gas continues to fill it as it also
leaks out the top, while the water level does not appear to drop as it
did with the opposite outflow polarity I used in my past experiments,
with the cell that had to be topped again weekly.
Torsion Propagation:
I tested resonant hollow tube lengths over the Aluminum plate
before cutting the hole, as well after cutting the hole to allow the
gas to escape through the tube. There is an incredible difference in
the field when gas is present inside the tubing. The "H field" is far
more present and active with the gas present, and a bigger hole made a
considerable difference.

This photo shows a 7.2 cm long 1/2" ID copper tube slid down over the 1/2" OD SS tube.
This acts mainly as a spacer for the next resonant disc.

The disc is cut from the 1/2" hole outwards to be 4.2 cm radius and acts like a circle of light resonant rods convergent
on the central gap. The effect is very strong and introduces another
form of Light resonant devices. It is my "H field" sensing disc. Stick
a finger in the hole at center and get hit with a taste of the H field
frequency. I enjoyed it for several days before setting it back on the
Cell tube.
These two resonant devices can be
used to find nodes in the tube leaving the cell, as well they can
indicate if the gas is present inside the tube, as they will light up
much more intensely when it is. If nothing else they could be tools for
cutting the end tube length to locate the best node area. Placing a
hand between the cells top plate and the resonant disc is a fast
initiation of the H field at a very intense level.
Monotomic Hydrogen can be very dangerous. In the next experiments with
Joe Cells it must be understood, read every thing you can about this
gas. I recommend the Browns Gas pamphlets printed by George Wiseman from
Eagle-Research. And then watch every video you can find on cars running
on Joe Cells. As everyone else ever creating a document I must state fully, if you do this, it is at your own risk.
Monotomic Hydrogen gas burns first with an implosion reducing its
volume by half, and then inside this an explosion. In the cylinder we
are trying to stretch these out into opposing motions of the piston. If
the right combination is hit on, then possibly even Nitrous Oxides can
form at the top of the process. Generally a good mix of CHON will all
be present, the building blocks of life as we know it. A changing air
pressure is all that is necessary for many interactions mainly of
Nitrogen, Oxygen, and Hydrogen, and many of the atoms present will be
in transition between diatomic, and monotomic states. It is when
Hydrogen is in its monotomic state that it may produce extreme large diamagnetic fields,
possibly even strong enough to push the intake valves closed so the
cylinder may now hold a strong enough vacuum to create nitrous oxides
in small amounts, that explode along with the H2 and O2 to make a burn
during the second half of the cycle.
Simply realize that if you trap in or collect these gases anywhere in a
system they may become bombs. They can implode, they can explode, or
they can do both. The cell may be breeding
a constant supply of H atoms and O atoms as well. If these get out of
the cell to the opened air they will quickly drop below the flash point
concentration, but if they collect upwards anywhere in containment,
they may explode with very little excitation energy needed. As the
gases set they will convert to H2 and O2 in the air which already has
some content of both present. We do not want to store them anywhere.
Engine Operation
My understanding to date on running an engine is that there are two
steps to the process, for a breeder cell, or what is called a blind plug operation.
This is where the tube from the cell is fully blocked off
and no gas is fed into the engine at all. The engine is running on the
air intake and whatever is happening [breeding] in the vacuum of the
intake manifold, as a result of the cells vibrations. In Kosols
Guardian sphere systems we noticed that when
using large vacuum CRT tubes much higher voltages would appear. So the
idea of breeding monotomic Hydrogen in a vacuum is not entirely without
basis, if there is a torsion field present. Joes latest videos
indicates he sees this as a vibration process happening inside the manifold and cylinders. He offers the Sterling engine be studied, to grasp this.
1 - The engine is set up with a
cell to feed the air intake of the carburetor, where the crankcase vent usually enters. Gas from the cell,
pulled by vacuum, enters the carb. The timing is slowly advanced as the
gasoline flow is reduced. This is called Shandy mode, where the
gasoline has not been fully removed, but the car is receiving more
power. At about 70 degrees advanced from Top Dead Center, the gasoline
is shut off and the engine is tunned up and tweaked
to run with the gas
from the cell produced, under vacuum on the cell. The tube is insulated
from the intake on the carb using a short rubber hose. This keeps its'
self generated + voltage off the engine, but allows the gas to pass,
without shorting out the cells internal voltage. SS heavy cells are
recommended that can fully resist this vacuum, plastic is dangerous and
will start to swell.
There is also a safety issue in
this direct connection that an explosion or implosion could travel
backwards if the vacuum in the engine was lost, destroying the cell.
Often a second water container is added to bubble the gas through
before it hits the carb. As the timing is being advanced this is a very
good possibility for a backfire. This was never dealt with in the Joe
Cell materials I have accessed, and I suspect it would alter the
diamagnetic fields considerably by routing the tubes through another
container of water. Step 1 however is not the end all, and is only a temperary step to getting the engine resonant to the cell.
2 - Now the tube is removed from the carb, the end is
plugged with a rubber section still present, and moved about to
find the best location for powering the car. The cell no longer looses
water, yet continues to run the engine.
Whether the H atoms continue to move through the rubber end cap section
or are now getting created inside the vacuum of the intake manifold
from the cells field imprint is an interesting question, but they are
not coming out of the water in the cell as it would then eat up
probably a liter an hour or so, and it has been reported this is not
the case.
To start the engine one must now seal the carb and generate an
excessive vacuum on the intake manifold. Once going this can be
released. The Throttle flapper may also need to be reversed to gain
proper control of engine RPM and air intake is the only way to slow the
engine. Higher vacuum = higher RPM and power. Lower vacuum = reduced RPM and power.
These are all the parameters I have been able to find presented is the simplest form I can come up with at present.
References and Credits:
Positive Power Zone Joe Cell video Page
authentic Joe Cell conversations with "Joe" and Peter.
[Witness Joe doing his magic and actually making water burn as if it
were alcohol.]
Hosted by Kelburn Koontz of c_s_s_p group
Magnetizing and cleaning home water recommendation using magnets with South poles inwards
by Smokey Dawson of c_s_s_p group
Cleaning, clearing, and electrolyzing water, preparation techniques and methods
by Bernie Heere of c_s_s_p group
Document author, compilations, experiment, photos - [torsion sensitive observations]
by David Lowrance of c_s_s_p group
"Joe" and Peter of the "Joe Cell" development in Australia, thank you
for sharing and for videos. Without your considerable efforts none of
us could be studying these techniques.
JoesCell2 discussion group
Joe Cell Free energy Device discussion group
And thank you Alex Schiffer for considerable reference materials and
discussion group efforts, and all others participating in the effort to
reach comprehension.
Home Back to Theory